最近跟對岸買了一塊叫做羅密歐(Romeo)的板子,不少功能匯集在一塊板子上面,之後再來跟大家推薦,現在問題不知道是不是因為在Arduino IDE選錯板子類型,導致上傳程式的時候把板子弄掛了,只要一上傳程式就會當掉移除電源、USB線、Reset,可以試的都試了,它就是無法回復,只好使出終極必殺技「Firware 重燒」,以前從來就沒有使用過這種功能,現在感到有些緊張,做完後才知道原來這麼簡單。
以下是原廠作業說明:
(資料來源)
To use your Arduino board to burn a bootloader onto an AVR, you need to follow a few simple steps.
- Open the ArduinoISP firmware (in Examples) to your Arduino board.
- Note for Arduino 1.0: you need to make one small change to the ArduinoISP code. Find the line in the heartbeat() function that says "delay(40);" and change it to "delay(20);".
- Select the items in the Tools > Board and Serial Port menus that correspond to the board you are using as the programmer (not the board being programmed).
- Upload the ArduinoISP sketch.
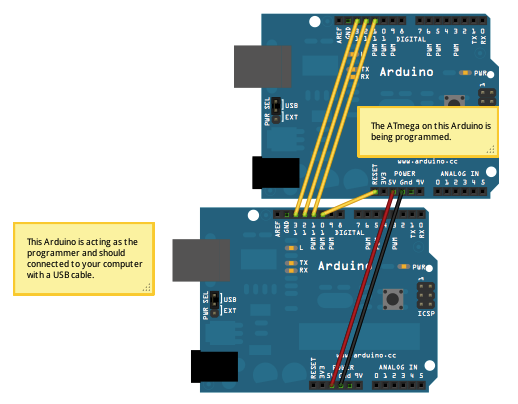
- Wire your Arduino board to the target as shown in the diagram below. (Note for the Arduino Uno: you'll need to add a 10 uF capacitor between reset and ground.)
- Select the item in the Tools > Board menu that corresponds to the board on which you want to burn the bootloader (not the board that you're using as the programmer). See the board descriptions on the environment page for details.
- Use the Burn Bootloader > Arduino as ISP command.
.png)
中文說明
- 在 Examples 中開啟 ArduinoISP firmware 。
- 如果你是 Arduino 1.0 的朋友請注意:這邊要對 ArduinoISP 的程式碼做一個小小的修改。找出 heartbeat() 的函數將 "delay(40);" 改成 "delay(20);"。
- 然後就去選擇板子類型及序列埠(Tools > Board & Serial Port),這邊是要選擇準備要做燒錄工作的那張,不是選擇被燒錄的那張。
- 上傳 ArduinoISP 程式到板子上。
- 將你要燒錄的板子依照上面的方式連接 (如果你準備要燒 Arduino Uno:你要在reset 和 ground 間加上一個電容)。
- 這邊就要選擇你準備要被燒錄的板子類型( Tools > Board) 就是要被 bootloader 的板子。
- 最後就選擇 Burn Bootloader > Arduino as ISP ,就可以等待它燒錄完成。
簡單的7個步驟就完成了,是不是很容易,我覺得主要會有問題的地方應該是不知道板子的類型,如果是 Arduino 官方的板子比較容易看得出來,可是像我這次所做用的變種板(Nano 328)就不見得可以很容易的一眼看出,如果燒錯 Firware 當然也是會出現其他問題。